Beta Address: http://blish.org/sdrdxdoc/midi.html
5.36 - MIDI Control Surfaces
5.36.1 - Overview
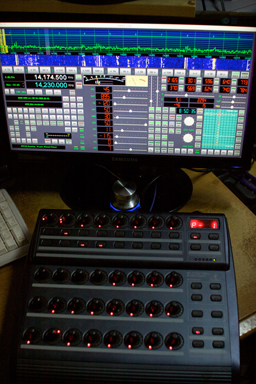
SdrDx supports the ability to use a MIDI control surface to control the various sliders and buttons in the interface. The model chosen for initial support is the Behringer B-Control Rotary Control Surface. There are several advantages to using a MIDI control surface (beyond the obvious one of having real knobs and buttons.)
One is that because the MIDI messages go to SdrDx even when it is not the active application, you can use the radio without having to leave the application you're currently working in — email, spreadsheet, photo processing, etc. Another is that the control surfaces allow a style of control not available through the GUI, for instance, you can tune at six different speeds with six different tuning knobs, or adjust the demodulator bandwidth with knobs.
Some control surfaces can memorize "scenes", which are essentially a memory of every setting on the board, so you can save and load entire radio setups in one action, right from the board. Finally, as all knobs and buttons may be re-configured, you can set the board up the way it makes sense to you.
The surprisingly inexpensive BCR2000 Behringer B-Control Rotary Control Surface brings 32 real-world knobs, as well as 24 more virtual knobs, and 20 physical buttons to SdrDx. SdrDx defaults to a configuration that immediately supports this control surface out of the box, but you can re-map any knob or button to any SdrDx slider, knob or button at any time. Also, if you have some other kind of control surface, if it can provide standard control change MIDI messages on channel zero, you can configure it to work as well.
5.36.2 - Official Requirements
If your control surface provides for parameter feedback, it should be set up to receive control change messages for MIDI channel one. SdrDx receives control changes no matter what channel they are sent on. You should have your control surface plugged into your computer and powered up before you start SdrDx.
5.36.3 - Limitations
A MIDI control surface can send a lot of control messages, and if you really twist the knobs vigorously, you can create a backlog of unprocessed messages, which SdrDx will busily process before it lets you do anything else. The slower your computer is, the more of an issue this could be. So be gentle with the knob-twisting and slider-pushing.
5.36.4 - Compatability
When SdrDx is running, it sends MIDI information any time you change a control in the main window, or adjust one via the TCP interface. Likewise, it's listening all the time, and if you have any kind of MIDI device active, SdrDx is likely to interpret any message from that device as some kind of instruction to modify controls, and much weirdness will result. Basic rule: You can run SdrDx, with or without a control surface or your other (e.g., musical) MIDI activities. Not both at the same time.
5.36.5 - BCR2000 Setup
At the BCR2000, plug it into the wall, plug a USB cable into the computer and the BCR2000, then turn on the BCR2000. Press and hold EDIT, press (tap) STORE to enter the main setup menu, then release EDIT. Turn the top left controller until the main display reads U-1. Now press EXIT. The BCR2000 is now correctly configured for use with SdrDx.
5.36.6 - Other Control Surface Setup
 and , respectively; knowing which controllers are expected to affect what items on the SdrDx interface (and the other way around for parameter display) will make initial setup much easier.
Basically, SdrDx sends on channel 1 and receives on all channels. A good start is to set your control surface up to transmit and, if it can read back the current setting, to receive on channel 1. That should complete your actual MIDI setup. Other than that, make sure it knows how it is connected (USB port, serial MIDI port, etc.) and that any drivers it needs are installed (especially under Windows of any stripe) and it should "just work."
5.36.7 - SdrDx Device Setup
With a new install, SdrDx defaults to using device 0 (zero) for both input and output and MIDI off. You'll want to turn MIDI on; see the MIDI dialog below. On a Mac with no other midi equipment attached, that seems to be the correct setting. However in broader testing, under XP, the MIDI output port o ( →Right-click MDI to set) needed to be set to 1 (one.)
However, under Windows 7 Starter, the input port needed to be set to 1 (one.) This will clearly differ from machine to machine.
It's difficult to know what this configuration will be ahead of time, so what you need to do is open the dialog ( →Right-clickMDI), set the values, quit SdrDx, restart it, see if that works. If not, try another configuration.
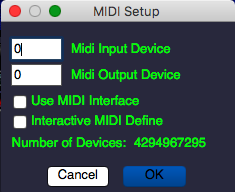
MIDI Setup Dialog
If you want to use MIDI, you need to open this dialog, and check the two checkboxes:  Interactive MIDI Define and Use MIDI Interface - If you change the Use MIDI Interface setting, you should restart SdrDx after exiting the MIDI setup dialog.
The dialog tells you how many ports there are. For instance, if it says there are 2 (two), then you can set 0 or 1 for either port. Setting values outside the limits of 0 and 1 results in no change to the port number. Remember, you need to restart SdrDx after making a change or it won't know about the new port numbers.
Just start at zero and work up. When sending is working, if your control surface supports parameter display, you'll see it change when SdrDx controls are adjusted. If it doesn't support parameter display, then you only need to concern yourself with the SdrDx input port number. You'll know you've got that right when adjustment of controls on your control surface result in changes on the SdrDx GUI.
5.36.8 - SdrDx Learn Mode, Sliders and Dials
Getting SdrDx to learn a slider or dial is a two-step process. Before you start, →Right-clickMDI and place a checkmark in the Interactive MIDI Define box. This enables the define process. When you're done defining controls, you should re-open this dialog and uncheck this control.
Begin by pointing at the slider you want to use with the control surface, and click the right mouse button. MDI should begin to flash white. Now, simply adjust the control on the control surface, and the control will map immediately -- you will see the control in SdrDx adjust along with the adjustment made on the control surface. To cancel, right-click any slider again prior to moving anything on the control surface, or press ESC.
5.36.9 - SdrDx Learn Mode, Buttons
Getting SdrDx to learn a MIDI control association is a three step process. Before you start, →Right-clickMDI and place a checkmark in the Interactive MIDI Define box. This enables the define process. When you're done defining controls, you should re-open this dialog and uncheck this control.
At this point, to define a control, begin by pressing the ESC key; MDI will flash white. Now left-click the SdrDx interface button you want to configure.  MDI will now flash blue. Finally, press the button on the control surface. To cancel, press ESC again any time prior to pressing a button on the control surface.
5.36.10 - SdrDx Learn Mode, Other Operations
This is a three step process. First, press the ESC key; MDI will flash white. Now press a letter key from the table below. MDI will now flash blue. Finally, operate the control on the control surface. To cancel, press ESC again any time prior to pressing a keyboard key.
| Key | Mapped Function | Map To |
|---|---|---|
| a | Low Demodulator Edge | Continuous Controller |
| b | High Demodulator Edge | Continuous Controller |
| c | Tune by 50 Hz | Continuous Controller |
| d | Tune by 100 Hz | Continuous Controller |
| e | Tune by 500 Hz | Continuous Controller |
| f | Tune by 1 kHz | Continuous Controller |
| g | Tune by 5 kHz | Continuous Controller |
| h | Tune by 10 kHz | Continuous Controller |
| i | Next Meter | Button |
| j | Previous Meter | Button |
Changes you make with learn mode are saved and will remain in effect the next time you start SdrDx.
5.36.11 - Recommended Control Surface
5.36.12 - Default Configuration
When SdrDx starts, it has a default MIDI configuration that assumes the Behringer BCR2000 control surface. Initial mapping is as follows, numbering is left to right.
5.36.12.1 - Upper Row of Knobs
This row of knobs is automatically mapped (by SdrDx) to 8 functions that are not otherwise available as knobs or sliders, to re-define them use the keystroke method (#3) shown above.
- Knob 1 - turn for lower demod envelope control - press knob center for
 AM mode
 - Knob 2 - turn for upper demod envelope control - press knob center for mode
- Knob 3 - turn for +/- 50 Hz - press knob center for mode
- Knob 4 - turn for +/- 100 Hz - press knob center for mode
- Knob 5 - turn for +/- 500 Hz - press knob center for mode
- Knob 6 - turn for +/- 1000 Hz - press knob center for mode
- Knob 7 - turn for +/- 5000 Hz - press knob center for
FM mode
- Knob 8 - turn for +/- 10000 Hz - press knob center for
5.36.12.2 - 2nd Row of Knobs
- Knob 1 - turn for VOL
- Knob 2 - turn for DCY
- Knob 3 - turn for I/R
- Knob 4 - turn for NBT
- Knob 5 - turn for NBW
- Knob 6 - turn for GRT
- Knob 7 - turn for BPA
- Knob 8 - turn for TXS
5.36.12.3 - 3rd Row of Knobs
- Knob 1 - turn for SQL
- Knob 2 - turn for CWO
- Knob 3 - turn for F
- Knob 4 - turn for Q
- Knob 5 - turn for Lpf/Hpf
- Knob 6 - turn for TRK
- Knob 7 - turn for I
- Knob 8 - turn for C
5.36.12.4 - Bottom Row of Knobs
- Knob 1 - turn for Upper Scope Knob
- Knob 2 - turn for Lower Scope Knob
5.36.12.5 - 1st Row of Buttons
- Button 1 - press for
- Button 2 - press for
- Button 3 - press for
- Button 4 - press for
- Button 5 - press for
- Button 6 - press for
- Button 7 - press for
- Button 8 - press for
5.36.12.6 - 2nd Row of Buttons
- Button 1 - press for
- Button 2 - press for
50
- Button 3 - press for
60
- Button 4 - press for
- Button 5 - press for CL
- Button 6 - press for GS
- Button 7 - press for
- Button 8 - press for
5.36.12.7 - Bottom Right group of Buttons
- Top Button 1 - press for
- Top Button 2 - press for ZE
- Bottom Button 1 - press for
- Bottom Button 2 - press for
| toc | index | guide | changes | keyboard | , previous | . next |